Having problems with your Corona Inverter Heater?. Are you plagued with ongoing intermittent E4 and E1 Error Codes?. Well, the chances are that you need to service your Corona Inverter Heater and give it a good cleaning. Taking it to a Corona Distributor can be both time consuming and costly, and in some locations there are just no distributors who are interested in offering servicing to these heaters, so why not carry out the servicing yourself?.
Here we provided a step by step guide (complete with pictures & video) on how to strip down and service your own Corona Inverter Heater. As usual common sense safety rules apply, in other words whilst its perfectly legal (at least in the UK) to undertake this work for yourself, make sure that you are both confident and competent enough to follow this guide, if not then its probably better to leave it to a professional or check a community social media page for a local handyman willing to undertake the work.
However most competent handymen and DIY’ers who are capable of putting up a shelf or assembling flat pack furniture should be able to service their own Corona Heater for nothing more than an hour or two of their time, when following this step by step guide.
For those who require a little more detail, there is also a 1hr and 30 minute video which can be found the bottom of this page
Top Tip:- It often helps to take photos of your own along the way, using a camera or phone as you carry out the disassembly, especially if you choose to disconnect any wiring or piping to give easier access, this way, if you run into problems during the re-assembly then you can refer to the photos.
First of all, here are the tools that you will need:-
Pozi-Screw Driver, Pliers, Wire Wool or Fine Sandpaper, Dish Detergent, Oven Cleaner, disposable gloves and a Vacuum Cleaner.
So lets get started. Sorry about the quality of the photos, but they were taken several years ago, using a low-res camera phone.
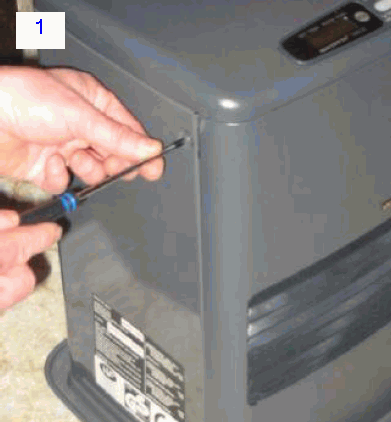
1) First of all, remove the screws holding together the front cover and hot air outlet grill. On some Corona Inverter heaters, the front cover and outlet grill are one part, with fixing screws on the sides. However, on other models (such as the Corona 3016) the cover and grill are two individual parts, each secured with two fixing screws. The main front cover screws on these models are located on each side, at the bottom of the panel, whilst the grill screws are located at each side and can be accessed once the main cover is removed. The following photo shows the one part cover, with side fixing screws.
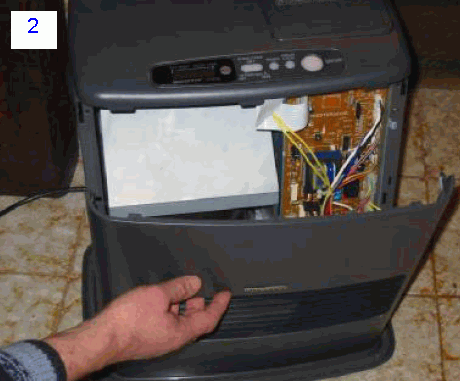
Carefully remove the front cover, giving access to the Electronic control PCB, and the grey, metal encased Burn / Atomization chamber
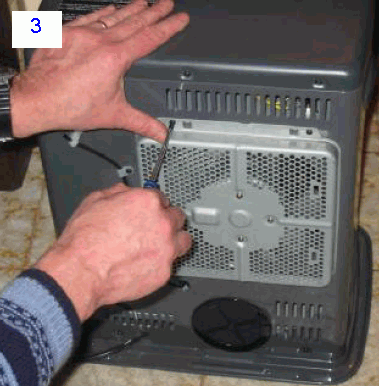
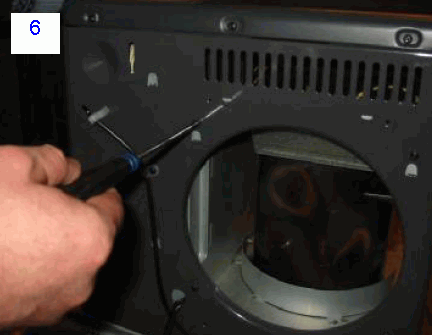
Turn the heater around, and remove the four screws which secure the combined rear convection grill and fan assembly. Once the screws are removed, lift the panel up slightly to unhook it from its mounting grooves, and gently place it on the floor. Note that the actual fan, and its wiring also come away with the panel, so care should be taken not to stretch or damage the wiring or fan blades.
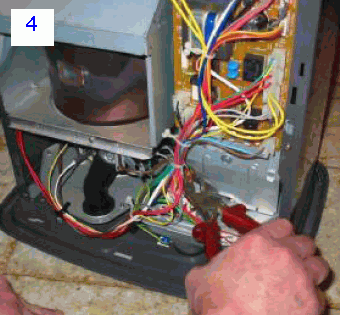
Next, locate the small electronic fuel pump which is found to the bottom right, under the control pcb. Using pliers, loosen and remove the pipe housing connector from the top of the pump. Once undone, the copper fuel pipe simply lifts out of the pump outlet nozzle.
Remove the single screw from the bracket mounting which holds the copper fuel feed pipe.
Return to the rear panel, and behind the previously removed fan assembly, are four additional screws. These hold in place, the main grey metal enclosure containing the burner.
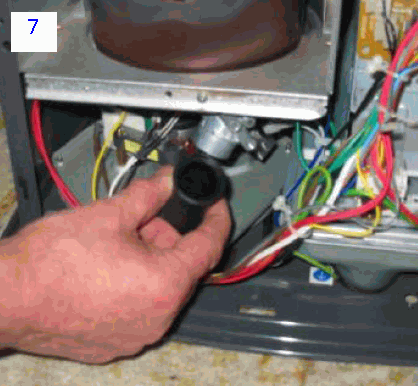
Remove the rubber air pipe, which connects to the lower combustion fan unit in order to supply air to the burner.
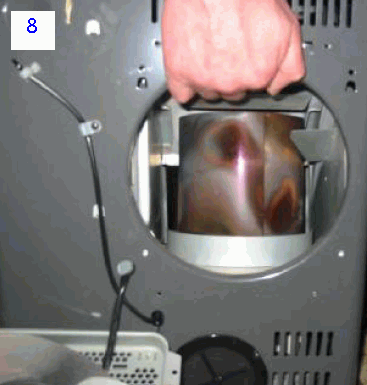
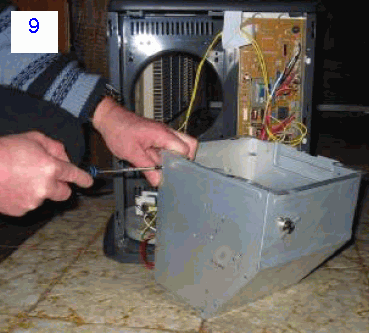
With slight force, push the grey metal burn chamber enclosure upwards and forwards in order to unhook it from the rear panel, and once released you should be able to pull the enclosure forward, and out of the front of the heater. Be careful of the fixed wiring which is still attached to the underside of the enclosure, but there is just enough length on these wires to pull the enclosure just outside of the front of the heater and lie on the floor / bench in order to work on.
Disconnect, the two yellow wires which are fixed to the thermal switch on top of the grey metal enclosure, you may also find it a little easier to undo some of the plastic wiring loom clips to allow a little more flexibility in the cables running to the enclosure. Next remove the side screws which hold the metal enclosure together in order to access the main atomization (burn) chamber,
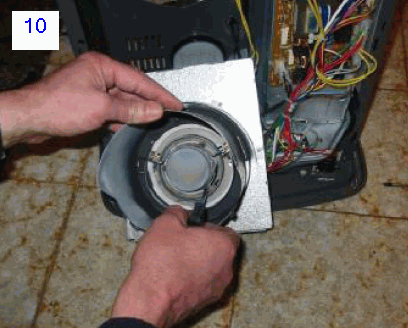
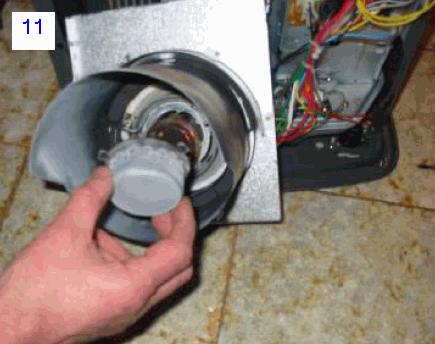
Once the metal sides of the enclosure are removed, you will now be able to see and access the main burn chamber. On some models you will now also need to remove the round metal top on the burn chamber. To do this, pull up the two metal tab ‘ears’ which are folded down, and straighten them upwards, the top should now pull upwards over the tabs and you can remove it.
Using a long screwdriver, undo and remove the three screws which hold the burner plates onto the atomizer. There are two parts to this burner, which should just lift out, however be careful of the bottom part, which has a very thin, delicate gasket underneath it.
Give the two parts a very good clean in order to remove all of the carbon deposits. First I soaked them for several minutes in a mixture of hot water and dish detergent, and then used some foaming Oven Cleaner (Mr Muscle Brand in the UK) and an old toothbrush to completely scrub the mesh clean. Wear gloves at this point as not only is it a dirty job, but oven cleaner is caustic and can cause skin burns. Rinse completely after cleaning and allow to dry.
Inside the burn chamber, there are two small metal rods. One of these is connected by a thick wire and is the igniter and generally requires no cleaning. However there is also another curved metal rod at the opposite side to the igniter, which is the flame rod (Flame Detector or FLOD). This is effectively a sensor which sits in the flame in order to sense that the heater has successfully lit and monitor the flame and so over time can also quickly get covered in carbon which changes its Electronic Resistance and will eventually lead to the heater incorrectly thinking that the flame is not longer present – shutting down with ‘E1’ or ‘F1’ error codes.
Remove the flame rod, by firstly disconnecting the wire attached underneath, and then remove the single screw holding the rod bracket in place inside the chamber. It may be useful to take a photo at this point showing the exact original position of the flame rod, so it can be refitted in the same position.
Pull the flame rod out, and also scrub it with oven cleaner. Next use some wire wool or fine grit sandpaper and gently remove any remaining stubborn soot and carbon deposits and return the rod back to as much bare metal as is possible without damaging the surface. Rinse in cold water, dry and refit the flame rod back into the chamber – maintaining its original position.
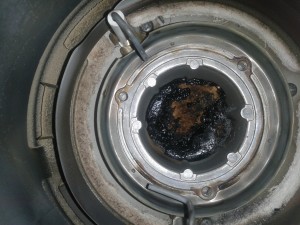
Finally, give the burn chamber a good clean out with a vacuum cleaner. Whilst you have the Combustion Chamber apart, its also worth checking the bowl under the burner to check for rust / muck build up. The image below was emailed to us by “Mister B” and shows large amounts of build up, which caused combustion errors, eventually leading to the heater continuously shutting down. Using Dipetane Additive at the dose of 10 ml to every 4 Litres of heating oil should reduce the amount of this Carbon build up
Once everything has been cleaned and allowed to dry, carefully Re-assemble the heater, test and enjoy your newly serviced Corona Inverter Heater!.
I would also recommend (if you are not doing so already) that you filter any fuel (regardless of premium C1 paraffin or heating oil / kerosene) through a “Mr Funnel” filter in order to remove any water / dirt contamination and help to minimise future issues.

I’ve also recently (2019) found a fuel additive called Dipetane which seems to help reduce the amount of carbon build up in the combustion chamber when added at the dose of 10ml to every 4 litres of fuel, and so should help prevent a return of the error in the future. (Although annual checking & servicing should still be maintained).
For those who require a little more information and a better, more informative guide, there is a video below which shows the entire procedure. Thanks to Jon Porter for providing the Video link, and to “Porky Wizard” for producing the detailed 90 minute video!
If you are still encountering “E” or “F” based errors on your inverter heater, even after following the guide above, then its probably time to replace the flame rod with a new part. Alternative, a work around exists which restores the functionality of the existing Flame Rod and is described in the following video.


Should that be CO sensor? Either way it ain’t got one! We do have CO sensors in the house, and neither have ‘spoken’ to us yet . . .
All of these heaters have sensors built into them, the idea being that if the Carbon Monoxide level in the room rises above a safe level, then the heater will automatically shut itself down. However the method of sensing seems to vary from model to model, some have a separate sensor PCB connected to the main circuit control board, whilst others have the sensing integrated into the main circuit board, making servicing and replacing the air quality sensing section less simple, as the entire main board will need replacing. It is possible to identify the failed components on the main board, but electronic fault finding, de-soldering components and re-soldering in new ones is fairly specialised and probably beyond most heater owners, so i’ve not covered that aspect on this blog. Generally its easier to just replace the entire main board (Which seems to be what the majority of distributors do), however fault finding and repairs at component level might be something that the Guy in Preston can do, so it might be worth a call since if it does turn out to be a Main Board issue a repair at component level is often cheaper than replacement.
The built in sensors can and do go faulty, meaning that even though the Carbon Monoxide / Dioxide levels in the air are still safe, the faulty sensors send back incorrect readings causing the heater to shut off needlessly. There are a couple of comments higher up in this page, from Henk Peter and ‘Mister B’ which highlight the problem, and in both cases these were Heaters sold outside of the UK and both had the separate sensors. So it was worth checking at least.
If the ceramic is beginning to break down on the Ignitor then its probably good practice to replace it (assuming the parts are still available), however I don’t think it will be the cause of the E6 fault, as the Ignitor is only active in order to spark a few times to ignite the burner at start up, it doesn’t play any part once the heater is running.
Unfortunately my only other suggestion would be to have the Main Board checked out, and repaired / replaced if found to be faulty
I have been advised of a diagnostic mode for this heater. It begins with unplugging the heater, and pressing and holding down the minus (or lower temp. adjuster symbol) and the timer button simultaneously – THEN with both buttons held down – plug in. The digital display will show (well it does on mine) b 30. Then – press start.
The stove should fire up and go through a 10 minute range of heat levels. The second (right hand) figure should maintain a reading of 50, steady throughout the sequence.
I ran this diagnostic program on my heater for a full 50 minutes, during which time the heater pushed out warm air with no error codes appearing. After switching off and unplugging – re-plugging to resume normal service, the stove was switched back on, and has performed faultlessly for the last two hours, (previously it was shutting down after 15mins and showing E6). Not only that, but the flashes of yellow flame (which the manual states as “normal”) have all but disappeared completely indicating a clean burn.
PS: Roger advises that there may be an issue with the pump, possibly worn, which will give a drop in flame current (the right hand number in diagnostic mode) which the flame bar reads as a fault producing E6. Good to know.
Result! And a big hat tip to Roger Banks at Dry-It-Out. http://www.dry-it-out.com/
Hello. I brought two zibro heaters, as a result of advise from here. They are really good. After two winters they are now giving error messages. I guess they need a service. E7 ( thermostat control? And E0 ( machine burning at a too low temperature?). Yes I have been using heating oil in them. Is the zibro similar in its maintenance to the corona.
The error codes on the Zibro heaters are slightly different to the Corona models. According to the Zibro Kamin group manual that I have, the E0 and E7 codes represent the following (although there may be code variations from model to model)
E0 – Temperature within the Heater too high
E7 – Room Temperature above 32c
I don’t for one minute think that the room temperature will really be above 32c or you would probably notice!. But it does indicate that there is some overheating going on inside the heater, or a faulty sensor.
The Zibro heaters are designed a bit differently than the Corona or the SRE Series, but the cleaning principle is the same. I do have a workshop service manual which covers several Zibro models with a complete fault finding / repair procedure it may not list your exact heater model, but since they are similar in design and components it should still be a big help to stripping, cleaning, servicing and cleaning your heater.
I’ve uploaded the full manual to a file hosting site, you can download it from the link below.
Zibro Workshop Service Manual
Hi there,
I have a Zibro heater which has been working fine. I am now getting an E9 message which I understand as the heater thinking it has been knocked or moved, but it hasn’t. Any idea what else could be causing the problem?
Thanks
Catherina
Hi Catherina
Most error codes for Zibro Heaters are different to the ones for Corona Heaters, so assuming that you haven’t taken that code description from the actual user manual for the heater, then you should use the general Zibro Error Codes which are listed on This Page. You will also find a service manual which covers most Zibro Heaters and can be downloaded from the same page, this should help you to investigate further.
According to the Zibro error codes, E9 translates to a clogged or dirty Fuel or Air Filter, so if you haven’t done so already, it may be worth checking and cleaning these filters first before moving on to other possibilities.
Hi,
I have a cuestion, witch voltaje work the oil pump?
Thanks a lot
Cristian R.
Thank you so much for this guide. I have just fixed my inverter 5006 after 2 years of it sitting unused. I actually nearly skipped it and bought a new one. It would appear that dirt in the fuel was the main cause of mine not working – there was a load of carbon and crud under the burner and of course this us where the fuel injector pipe leads in to, so the fuel mix was not able to reach the burner properly and the unit kept shutting down with E4 showing. Now lights instantly, no smoking or smells with ordinary bulk paraffin. Invested in a Mr Funnel to keep things cleaner in future.
Many users of the Inverter 3007 and 5007 report a CO2 fault: the heater will work for two minutes or even ten, then shut down with the CO2 error code showing. This seems to occur particularly often in Continental European models.
It is very easily fixed.
All you need is a Phillips screwdriver, a toothbrush and a paper clip.
After disconnecting the heater:
1. Remove the front panel (two screws on the side) with the screwdriver.
2. Locate the transparent CO2 pipe curling up from the bottom right. Brush the white filter on the inside of this pipe with the toothbrush.
3. Locate two little holes marked S1 on bottom right circuit board. Insert two ends of the paper clip (or part thereof) into these holes.
4. Turn on the heater again and let it fire for about 10 seconds. Then shut it off and disconnect.
5. Remove the paper clip, replace the front panel and turn the heater on. It should work perfectly, because the operation you carried out re-calibrated it.
my problem with my corona heater is not erorrs.i just don’t no what should I do that my heater work for 24 our and dont be shut down every 3 over!
thank you for your step by step guide.
Hi,
I have two Ruby heaters.
Both cut out after anything from 5-20 minutes.
I hear 3 beeps, the ‘deodorise’ light comes on – and error code ‘Ed’ (capital E, small d) is displayed.
I’ve even used a magnifying glass to check the error code – it’s definitely Ed.
I can’t find this mentioned anywhere. It’s not in the manual, it’s no where on line.
Any thoughts on what’s wrong with both heaters and how I can fix? At the moment, I’m constantly trying to turn them on & off!
Please could you copy your reply to me by email – I can never find the threads / replies on my phone!
Anthony Weir, I would like to say a big “Thank You” people like you, restore my hope in humanity! taking time to help others, without reward !
Best Regards James
Hi 3 weeks ago I purchased a second hand inverter 5006. It appears to be a 2004 moddel but I could be wrong, the heater arrived and I did nothing with it just filled her up with heating oil filtered through a mr funnel. The heater has ran solid for the full 3 weeks until this morning, I came down the stairs to be met with no heat and a E4 error. I turned the heater off then back on and she failed to start on ignition and shut down with a E0 error.
I followed the detailed strip down procedure and even had to make a new gasket. I also noticed the filter and tank were full of crud so cleaned the filter out and removed and wiped out the tank the best I could could.
The heater is all back together now and I have run through ever option, she starts up and runs without fault.
A big thank you
Back again with a repeat of Februaries E6 failure.
Last time the run through with the diagnostic mode cleared my E6 issue. Not so this time. All is clean and dust free, connections good, and though I have yet to discover the location of the ‘CO sniffer’, though the motherboard has a plug called “Air sensor” with the two blue wires leading off to the plastic coated sensor at the back of the unit, I have yet to remove the motherboard to investigate what lay behind. I can’t imagine a sniffer of sorts being buried behind it – but who knows.
Next move will be to have the unit checked out by a specialist and a trip to Preston – unless another has an idea to follow?
I have checked out Henk Peter, and Mister B’s posts, and my set up is different to Anthony Weir’s, no luck so far.
Images on Photobucket:
http://s80.photobucket.com/user/Degsy2us/library/Inverter
Hi Derek
Reading back through your post from February, I believe that you were advised by a heater technician that your pump was failing an may need replacing. Has the E6 failure occured after the pump replacement? or haven’t you replaced it yet?.
What is the flame rod current read out, when you repeat the diagnostic test this time? does it identify a drop, which could indicate that the fuel pump has perhaps worn to the point of requiring a replacement?.
In relation to any parts that you need, there is a new company who profess to be able to supply new and used spares for Corona Heaters, so it may be worth shopping around for something as expensive as a fuel pump. http://lancashirefuels.co.uk/corona-heaters/3932932
I didn’t replace the pump, as after the initial diagnostic program run back in February, all seemed well, and it ran faultlessly whenever needed. This present failure is after a long Summer unused, and it has remained indoors in the same room in which it has previously been used in.
The first diagnostic test two days ago showed a flame current reading that fluctuated rapidly between 17 and 49 for around 30 seconds, after which it steadied at 50 and remained there while the left hand reading went from 23 down to 6, where it remained at 6 – 50, during which time it blew steady warm air, and would still be blowing now if I hadn’t ended the sequence 20 minutes later.
Then I shut off, unplugged, and delved inside again.
The second diagnostic was done after I had looked more closely at the air sensor wiring to try and determine if there was a way of cutting it out of the equation. With no clear indication of a CO sensor to use the paperclip technique, I didn’t see how I could, so put all back together and ran the diagnostic again. This time the flame current read out started, and remained at 50 from switch on, all the way through the test with no fluctuation at all, ending up with the same read-outs of 6 – 50 blowing warm air continuously. My logic tells me that if the pump was on the way out, it wouldn’t be burning steady, if at all. But not being an electronics expert, or even partially knowledgeable in electronics – I could still be wrong on that score.
The heater will run for a good ten to fifteen minutes on high heat from switch on, and then E6 will appear with the flame going out simultaneously while both fans continue to run until the unit cools sufficiently, when both fans then stop.
What I have not done is take off the motherboard to see what lurks behind. Though my scepticism is inclined to think the whole caboodle needs trained eyes and hands on the thing. Preston and Blackburn are equidistant from me, and two hours away by road, so it looks like January before I can make that trip. A bit late today to phone them, but I will do so on Monday to sound them out – thanks for the link by the way.
Electronics should be steadfast and reliable. Perhaps those sixty year old wick stoves have their place after all!! ;-)
The “paperclip method”, refers to heaters which have a second PCB containing a dedicated CO2 sensor located just below the main PCB inside the heater, some models don’t have this additional PCB (my own Corona 3016 model included) and i’ve never got to the bottom of how it samples the CO2 content from the air, or whether it even does despite the feature being reference in the user manual. What it does have are two ‘bead’ type sensors located at different levels on the rear panel of the heater, one of these I’m assuming is the room temperature sensor (thermistor), no idea what the other one does, but it doesn’t look like any air quality / CO2 sensor i’ve ever seen, unless the Japanese have found some clever way of achieving it with this component. Without a schematic of the circuit board, or Bill of Materials, its going to be next to impossible to guess what this component does, and how it works as a CO2 sensor – if indeed that is what it is, overriding it without knowing what the circuitry behind it does, or confirming its demise without knowing what readings are expected from a healthy, working sensor is also just as impossible. Even the service agents of a lot of goods these days, tend to just replace circuit boards with new ones, rather than strip down and fault find existing PCB’s and repair them by replacing failed individual components!.
Electronics these days should be steadfast and reliable but seldom are, I thought the same thing when I bought a new-ish car, and TV both in the upper price range and supposedly quality names yet both failed with Electrical problems shortly out of warranty, and neither can be repaired economically, and lets not forgot the exploding smart phones which are nearly always in the news!. In contrast, I have a Fidelity portable TV in the loft which I was given when I was nine years old, which still works just as good as the day it was bought, over 35 years later, and was only resigned because the original transmission system was switched off. Sadly products today are made to a budget, which is dictated to by accountants, not engineers. Sometimes I wonder if a products’ lifespan and longevity isn’t also, decided by the aforementioned accountants and then programmed in by the engineers.
Back to the subject in hand, fortunately the majority of problems with these heaters, which would normally result in them being condemned can be resolved simply by servicing and cleaning, and replacing relatively cheap parts like the Flame Rods, as many have already reported success with. However, there will always be a percentage of failures in the field, caused by internal component failure and general wear and tear which cannot be resolved by servicing. When these occur, and without access to a service manual or schematic diagram its down to two choices. Either guesswork and a process of elimination by replacing parts ad-hoc, starting with the most likely first on a DIY basis or alternatively referring the heater to a service agent for a more professional diagnosis at a cost. In your case you have effectively already had what amounts to a diagnosis for the fault on your heater by an authorised service agent for Corona, which I would hope would come from professional experience, and access to service manuals, rather than the process of elimination which a DIY’er would use.
Sadly, replacement fuel pumps are expensive, and once again it comes down to the throw away society which we live in, when some replacement parts, cost a large percentage of the cost of a new heater, despite being mass produced, probably for a few yen or dollars. You could possibly ask the vendor that if the pump doesn’t solve the problem (as they advised) whether they will take it back on a sale or return basis. I supplied the link to the other supplier, not because of where they were geographically but because they advertised that they sell used parts for these heaters, which should cost far less than a new pump.
You mentioned that this heater was purchased back in 2003, I have no idea how much use it has had over the last thirteen years, but I suspect it is a candidate for a wear and tear failure by now :) and a fuel pump is a moving part, rather than being entirely electronic.
I read you loud and clear – and agree with all.
Will post more when success is achieved.
There’s a chap on You Tube who tried the paperclip trick – and failed. But succeeded with bypassing the CO sensor as has previously been described connecting blue and grey wires (he had the arch type sensor). But mine’s like Admins – not visible in any recognisable form, so the pump looks the most likely candidate for replacement.
PS: Planned obsolescence is the nature of todays beast. Built to a price that generates maximum profit and at minimum costs to ensure repeat sales.
Good day to you
I recently purchased a secondhand inverter 3003
Is this the same as a corona so i can use the corona manual?
recently i got some e codes and shutdowns like E0 E2andE4
If it starts it is with a puf of smoke / mist if it is not starting alot of mist
I use lamp oil as burning fuel i am in proces of buying a mr funnel
Please advise
Wkr koos snel
The model I refer to is inverter 5006
Thank you
Anthony Weir.
A massive thank you, followed your steps and am back up and running with no CO2 fault. Thought this would be hours of endless stripping down and problem solving but best part of 10 mins and nice and easy. Once again Thankyou
hi admin,
strange probs with my inverter 5006,a couple of days ago while it was woking hard there was a click and the unit just shut down ,no error codes , just like someone pulled the plug, i noticed it was a bit hot on the top and left side carry handle area, about ten minutes later after cooling down the power came back and same happened,,so a service and clean out all fine but noticing a lot of yellow flames and spluttering ,once it settles down to minimum power its fine ,i cant sus it out ,main suspect to me is blower under rubber blast pipe or fuel pump, any idea anyone ,all components are squeaky clean. cant moan if i need a new one as its worked hard for seven years now
ps, see zibro lc30 on e bay 205 pounds seems a bit cheap? thanks admin.
I have just the piece on running a diagnostic .
just tried it and the right hand figure is a steady 50 the left figure is 3.
the guy says his figures are 6-50. any idea what the left figure is for.
thanks , jon
No idea. I can’t think of any normal fault which would kill the power instantly, usually the heater will shut down in a controlled manner and then display an error code. Have you checked the mains cable for a loose connection or broken wire?, tapped the circuit board for a dry joint, dodgy relay or broken track? (careful doing this when running as there is mains voltages on these boards). The only other thing I can think of, is that there is a overheat trip fitted to the heater, normally this is a thermal switch which looks something like this, generally they are only fitted to provide last ditch protection in the event of serious internal overheating and work by cutting off the mains power to the unit when a certain temperature is reached. It would be strange that this was operating before any normal overheat shutdown protection, but it would explain the click. If the unit is overheating, then since you have already cleaned the combustion chamber, its probably down to a blocked intake pipe or a worn or failing fan which isn’t running at full speed.
thanks admin,
there is what looks like a cut out under the burn chamber on a bracket.
i soaked the injector pipe in carb cleaner for a couple hours so i think the blower is failing as you say..not to worry its paid for itself ten times over. all the best ,jon.
Hi, I bought a brand new corona 5006 to ship to Cyprus I didn’t have time to check it as I received it the day the shippers were collecting my stuff.
Anyhow, it has never worked. It shows E9. I have sent several emails to the supplier but he hadn’t responded. I hadn’t wanted to open it myself as it should be covered by a warranty and I hoped there would be a service place in Cyprus, kerosene heaters being very popular for two months of the year.
So, E9 is auto shut off, presumably in case you knock it over etc so I presume there’s a microswitch and a lever and it has been jiggled during shipping and stuck.
Can you please advise me where to look for this cut off switch?
Cheers, Steve.
Hi Steve
I think its far too sensitive to be a microswitch, in the conventional form. Looking at the Zibro Heater Service Manual, the tip over switch is mounted in the base of the heater, towards the back. There is every chance that the Corona heaters have them mounted in the same position.
Hi I cleaned my inverter as per the instructions in the video everything is lovely and clean, it worked perfectly for a day then e4 fault returned, so I took it apart again, it starts quickly and runs for 10 minutes then e4 it does make spluttering crackling noise while it’s running
@ Mick, are you using Standard Heating Oil or the “Approved” Premium Paraffin recommended for the heaters?. If using domestic heating oil, are you filtering it for water and contaminants as it goes into the heater tank? – I recommend using one of the Mr Funnel style filters, which will not only remove dirt and debris from the fuel but will also remove all traces of water from within it too. Kero traps water readily, especially when stored in underground metal tanks over the winter months, and the spluttering and crackling noise could be indicative of water contamination, which these heaters are very sensitive too. Even if it doesn’t solve the immediate problem, its good practice to filter the fuel routinely.
I would try the above first, before looking at other solutions which may require replacing parts within the heater.
Hi thanks for replying, the fuel I’m using is kerosene for the central heating, I’ve been using a Mr funnel for some time but have replaced with a new one and I’m also now using dipetane, the fire works fine for a while then starts to splutter it also smells of fumes I turn it off for 10 minutes, and then restart and it’s fine again for a few hours, it’s got me baffled
Hello. I’m trying to disassemble the burner on a zibro LS32. So I can clean it up.It’s very different to the corona. Anyone done this? I’m not sure how to do it, and don’t want to force anything. Thanks
hi serviced inverter htr as shown above and all was well but now soon as it reaches temperature it goes e4 agai ,if I raise temp to 30 it will run all day could this be a faulty flame rod ?
Hi my scot, rolf inverter heater was working fine then started coming up with an e5 error, I’ve done a service but still just an e5 error, any help would be grateful.
power going to heater but display switches won’t work just showing —- is it possible something not connected inside and if so what is the solution
Hi hope you doing well! My heater showing error 1.it normally turns on with display then after some seconds it doesn’t blow up like before. After that showing Error1. Kindly help me to resolve this problem.
Thank you
Hello
I have x2 heaters, neither more than 2 years old. I am using central heating oil adding 5ml of Diapthane per refill. with no forewarnings, Both have stopped working!!!
x1 gives E9 code and the other E2-E6-E9 codes. Both are powering and there feels a warm air, however, usually less than 1 minute the errors stop the continuing. I have drained the onboard tank, except for some pure paraffin and diapthane, left overnight but no difference. I have a new filter between the tank and refill tank. I’m at a FROZEN standstill. PLEASE ANY HELP
Michael, you don’t mention the make and model of the heaters, but as you have commented on the Corona servicing page, i’ll assume that the error codes are both on a Corona brand of heater, and since all of their models share the same error codes I can address them both on the same reply.
E9 is triggering of the movement sensor, this is the sensor built into the heater which senses it being knocked or tipped over, usually this triggers when somebody knocks the heater, but it can be down to vibrations from nearby appliances or being placed on an uneven surface.
This sensor, being a safety device can be sensitive, So make sure that the heater is on a level surface, with no nearby vibrations, also try it in a different location to see if the fault clears. This fault isn’t caused by anything to do with the combustion process, or fuel quality, it is purely related to the built in shock sensor.
Among the three faults you have listed on the second heater, E6 is unfortunately an internal non serviceable Electronic Fault, usually related to a component failure such as the fan, igniter, Electric pre-heat Element or even a component on the control PCB itself. I assume that you have already tried cleaning the combustion chamber, and especially the flame rod as per the guide above?, as this may be something to try before you take it to a service agent.
If any of the E5, E6 or E7 numbers appear in these comments, I generally refer the Author to taking the heater to a service agent for repairs – as these codes are all listed by the Manufacturer as being triggered by an internal component failure. But there is no harm in trying to cleaning procedure above, and checking for obvious things when the heater starts, such as the fans starting correctly and reaching their normal speed
Did anything happen around the time that these heaters went faulty? – e.g Thunderstorm, Power Failure, Running from a Generator or the power being turned off whilst the heaters were running?.
Are these heaters used in the same room, or different rooms?. It might be worth trying them in a different location – i.e Different Room, Shed, Garage etc to see if this affects or changes the errors in any way.
Hello
My Sincere Grateful THANKS for your response. Sorry, x1 Heater is Zibro and x1 Toyotomi heater Both 3kw. Both are in different rooms within my home. As far as I’m aware, there were no instances of power cuts, etc. Both are surge protected. from mains 240v In the past, I’ve had E6 codes and found by cleaning or replacing in-tank filter fixed such. Not this time. As far I’m aware, there is only 1 Agent/repair in my vicinity, FY8 3EL. I’m informed by a friend a previous customer of the agent/shop unless the heater and paraffin were purchased from the shop, and replacement paraffin purchased, then they do not provide assistance. Further, if central heating oil has/is the fuel used? Then again No assistance provided. Both my fires have only ever used domestic heating oil. I have considered buying replacements, however sourcing is one matter, but the prices are extortionate, i’ve seen one @£250 aand another @£399.Crazy prices. From the time and patience i’ve put in trying to find a fair price. one could almost believe that the range for sale is purposefully being cut back? Yes tried cleaning the combustion chamber and flame rod which didn’t have much deposits. Checked the fittings for being loose etc. one thing I did not see is the oil filter as mentioned to carefully removee and gently clean – mentioned on youtube uk. i’ve checked till i’m crosseyed to no avail. I MISS the heaters GREATLY. I’M DISABLED AND HAV RAYNARDS TOO. ANY ASSISTANCE GATEFULLY APPRECIATED. MANY THANKS
Hi Michael
As you have found, these heaters do lack useful technical information and service support in the UK, however service documentation is a little bit more widely available in Europe, where the use of these heaters is far more widespread – the problem is, any information or documentation which is available, is generally not written in English, as its intended for European service agents rather than the general consumers.
I’m not sure how useful this Zibro service manual will be to you, but its in English, and its possibly more information than you have seen already, and towards the end it gives an “E” code error list, with a flow chart explaining the cause and possible solutions – the E code diagnostics start on Page 73 of the manual below, if you don’t want to read through the entire thing.
http://www.electricheatingcosts.com/Zibro%20Service%20Manual.pdf
From what I can see E9 potentially leads to a Fuel Pump issue – assuming the E9 is on the Zibro heater. Although there are several other things to check as the flow chart for this fault code is quite comprehensive as it surrounds combustion issues. It might be worth just going through the ‘E’ codes in the manual, and try each solution as far as you can.
Although the fact that you don’t seem to have a mesh fuel filter on your heater is a bit of a concern – these fit directly inside the fuel filler opening directly under the removable metal fuel tank – the bit which the metal fuel tank fits into. Often these fuel filters also have some kind of a post sticking up out of the centre, which pushes the spring release on the metal tank cap, in order to release the flow of fuel into the tank in the base of the heater, so it would be unusual for it to be missing. This plastic mesh filter traps debris and dirt from the fuel and it is quite surprising how much it catches (I clean mine about every 5 tank fills). If it is missing, then this would allow those nasties to flow through the pump and into the combustion chamber, although the pump would likely be the first casualty.
I think faulty CO2 sensors can also be a cause of many problem on Zibro heaters, and replacements can be found online – usually in Europe.
I do think it shortsighted of the Service Agent not to open their doors to repairs and servicing for all heaters just on principle – especially given the time of year, after all a mechanic won’t refuse to repair a car if it has been run on Supermarket Fuel instead of Shell Ultimate!. But I have heard and have read about this before.
Obviously they are free to run their business however they choose and I can understand their stance from a warranty prospective as running on anything but expensive approved premium fuel (which defeats the point in using them for many people), will void any warranty, but i’ve got no idea why they would refuse to repair or service products which are out of warranty, or refuse to supply spares to those who want to service the heaters themselves. I imagine it could be quite profitable, provided of course that they ensure that any replacement parts will have their Warranty voided once the customer runs on heating oil – but I think most people realise this, at least the ones who seem to comment here.
Given virtually every visitor who has left a comment here over the last ten years has been using Heating oil at some point, if not continually, so I suspect the service agent is cutting themselves off from quite a lucrative after-sales market in repairs, parts and servicing – but if they can afford to do that at this moment in time when most businesses are struggling, then its an enviable position to be in!.
Fortunately, our European neighbours have a more relaxed stance, and on the continent spares for pretty much all heaters are widely available, even down to sensors, circuit boards and replacement pumps. But you do have to factor in the cost of some of the replacement parts over the age / condition of the heater, and a brand new one, but some repairs can be economically viable based on parts cost.
I know that this company have supplied UK customers with spares in the past, although I don’t know if this has changed recently in relation to Brexit, but they will probably still be happy to help with the supply of any parts which you need.
https://sav-pem.eu/7-chauffage-poele-a-petrole?q=Marque-ZIBRO+KAMIN&page=2
The link above takes you to the page for Zibro heater parts, in case you decide to fault find and eventually try a repair to the heater yourself and need to obtain replacement parts. They have a reputation for being helpful, so its worth an email to them to double check any parts are the correct ones, before buying, if you give them the heater model number and what you need they may be able to obtain it for you.
Obviously, how far any reader takes repairs and servicing of their own heater comes down to a combination of each individuals DIY skills and knowledge, but all of the information to at least point you in the right direction, for the Zibro at least, should be contained at some level in the manual above.
The prices of these Heaters in the UK are expensive, certainly when you consider you can buy generic branded ones in Italy for around £140 / £150. There was an Italian company called Brico Bravo whose Ebay store I used to link to every Autumn, but they stopped shipping outside of Italy about 12 months ago, citing problems with heaters being damaged in transit. Which was a shame, as they were routinely £100+ plus cheaper than in the UK, and I still have a ‘Kero’ brand heater purchased from them in 2011 which has never given any problems.
If you do decide to replace, I have however, been able to find this Company in Spain offering this heater, who appear to ship to the UK for about £18. This would put the price of the heater at just under £200 delivered to you.
https://www.bricowork.com/estufa-parafina-inverter-3200w-linea-plus-b1318/
Could you perhaps leave a comment to identify the codes which apply to the Tayo heater?, this may be a bit more difficult as these are often Japanese / Chinese generics, but i’ll give it a go.
Hello.
Hoping you can help.
We’ve 2 if the Corona 5096 inverters. After doing a full service on them one is 100% perfect and as good as new. However the other just won’t fire up and giving E0 error. I’ve completely changed the fuel in canister and tank but still getting E0. It did fire up after 6 attempts but now doing same again. I know the fuel is ok as it did fire up but after shutting it down it won’t restart again.
It’s got me totally baffled.
Any advice would be gratefully received.
Regards Mark.
Update to my question.
I finally got it running by repeatedly trying to start it, it seems touch wood to be running ok now but I’m asking if by servicing them it can lead to initial start up issues until its bedded back in say. I cleaned the flame se sensor and igniter but they have seen better days.
I’ve had this before on another heater stood for a long time it did run eventually but took what seemed ages to get it to ford up.
I’m curious if they get used to running poorly and once cleaned it upsets the balance.
Trying to find spares in the UK is a nightmare as ideally I’d change out these parts if in doubt.
I’ve pics of the sensors but how do I upload them it may help you diagnose an issue.
Hi Mark, I don’t think there is enough programmable intelligence inside these heaters to adapt to changing / aging components. Most faults are caused by the delicate balance fed back from the Flame Rod, and the circuitry inside these is so sensitive that even a small change in parameters can cause the heater to trip into a fail safe mode, or just not start at all, and carbon build up and wear is more than enough to change the resistance of the rod to beyond its expected values.
Wire wool is by far the best method of cleaning the flame rod, but if the resistance has been changed by wear and tear its generally time to replace it.
There is a method of adding a small circuit between the flame rod and the circuit board, which restores the parameters without compromising the safety aspect, and it was covered on Youtube. I will see if I can find the channel.
Spares aren’t easy to come by in the UK, especially if you have been running on Heating Oil, you are likely to get barked at, then read the riot act on Warranty etc. The rest of Europe are a bit more tolerant, and are generally happy to sell spares – at least prior to Brexit.
If you do decide to replace the phrase is “Contrôleur de flamme pour les poêles a pétrole CORONA”
I’ve found https://sav-pem.eu to be useful for listing spares.
Hello.
Thanks for that I have found a supplier in the UK nearby me.
Filters £10.
Flame sensor and igniter £9 each.
But I’m now experiencing a new problem, a nasty smell when running, fuel seems clean but filter dies go dark after 3-4 days. I cant get my head around this new problem.
Is it Fuel or something more sinister.
Any ideas would help. To add it’s only recently started doing this but we are running it more due to extremely cold temps.
Hi everyone just an update for those with heaters who live in the North West
Please note that I have no connection with this company, but I can personally recommend the service which they offer because I have used him myself,
Contact number for the Northwest Engineer is below should you decide to follow that route.
Alex – 07988774336
Inverter Zibro Corona service centre
33A Bonds Lane Banks PR9 8HG
Hello.
Firstly thanks for reply to previous question was very helpful.
My next issue is more complicated I fear.
After servicing the heater its run absolutely find until now. For some reason it doesn’t seem to be getting as hot as it did, the air coming out isn’t as hot as it was and it struggles to hit temps over 16 degrees. Before you couldn’t keep your hand in front of it as it was very hot now you can, the fuel is spot on so could it be a burning issue or flame sensor issue or totally separate matter.
We’ve 2 heaters and the second gets much hotter and faster.
Any ideas would be gratefully received.
Regards Mark.
Hi Mark
I don’t think the flame rod will have any bearing on the heat output, its purpose is purely to detect the presence of the flame, and cut off the heater and fuel pump to stop the fuel flow if the flame fails in order to stop hot heating oil from leaking everywhere. Its more likely to be a combustion issue, are all of the fans running at a good speed and not blocked. It may also be worth checking the small needle injector nozzle which squirts fuel into the combustion chamber in case its partially blocked. What colour is the flame, once the heater starts?.
Mark.
I’m a bit confused as to which comment was the one that you wanted to be active, as on your other comment you mention that the fuel was fine and you didn’t think it was the cause of your heat output issues, but yes, if there is a problem with the fuel then yes it will affect the heat output!. There is a fungus called Diesel Bug which can grow in fuel storage tanks, usually as the name suggests it targets diesel, but it can affect heating oil as well. These spores can cause havoc with fuel systems and can cause darkening on filters, so its a possibility. Obviously I wouldn’t recommend still running the heater on this fuel with this possibility as it can cause serious issues with the components. The first thing I would try, is to run the heater on a tank of premium paraffin – the pre-packed 4 litre containers available from B&Q and hardware shops. If the heater runs fine on this, then it points to being the fuel which is the issue.
Hello.
Flame seems blue with flickering of yellow simalar to what you see on a gas hob. I’ve since found out the pump itself can gum up causing issues supplying the required amount.
Do you have a article on stripping these down with pics, I’ve been told how to it but theres numerous small springs and washers in the assembly. Very tiny so easily lost.
The local service centre was very helpful in this advice on stripping them down and to be honest I thought they were sealed units but it makes sense if the tank is cleaned out, burner assembly done that if the pump is gummed up a vital part in the chain is missed out.
I know there’s 2 tiny countersunk screws once the pump is out then the internal assembly is accessible.
They also stated they recoat the burn chamber with high temp spray to reduce the chance of deposits sticking.
Regards Mark.