Having problems with your Corona Inverter Heater?. Are you plagued with ongoing intermittent E4 and E1 Error Codes?. Well, the chances are that you need to service your Corona Inverter Heater and give it a good cleaning. Taking it to a Corona Distributor can be both time consuming and costly, and in some locations there are just no distributors who are interested in offering servicing to these heaters, so why not carry out the servicing yourself?.
Here we provided a step by step guide (complete with pictures & video) on how to strip down and service your own Corona Inverter Heater. As usual common sense safety rules apply, in other words whilst its perfectly legal (at least in the UK) to undertake this work for yourself, make sure that you are both confident and competent enough to follow this guide, if not then its probably better to leave it to a professional or check a community social media page for a local handyman willing to undertake the work.
However most competent handymen and DIY’ers who are capable of putting up a shelf or assembling flat pack furniture should be able to service their own Corona Heater for nothing more than an hour or two of their time, when following this step by step guide.
For those who require a little more detail, there is also a 1hr and 30 minute video which can be found the bottom of this page
Top Tip:- It often helps to take photos of your own along the way, using a camera or phone as you carry out the disassembly, especially if you choose to disconnect any wiring or piping to give easier access, this way, if you run into problems during the re-assembly then you can refer to the photos.
First of all, here are the tools that you will need:-
Pozi-Screw Driver, Pliers, Wire Wool or Fine Sandpaper, Dish Detergent, Oven Cleaner, disposable gloves and a Vacuum Cleaner.
So lets get started. Sorry about the quality of the photos, but they were taken several years ago, using a low-res camera phone.
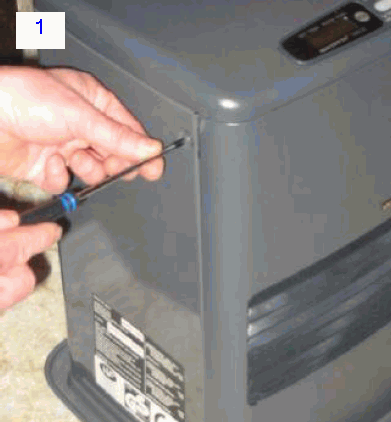
1) First of all, remove the screws holding together the front cover and hot air outlet grill. On some Corona Inverter heaters, the front cover and outlet grill are one part, with fixing screws on the sides. However, on other models (such as the Corona 3016) the cover and grill are two individual parts, each secured with two fixing screws. The main front cover screws on these models are located on each side, at the bottom of the panel, whilst the grill screws are located at each side and can be accessed once the main cover is removed. The following photo shows the one part cover, with side fixing screws.
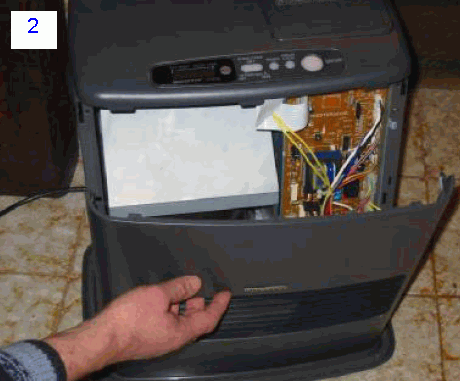
Carefully remove the front cover, giving access to the Electronic control PCB, and the grey, metal encased Burn / Atomization chamber
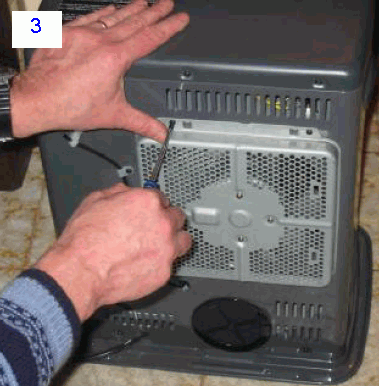
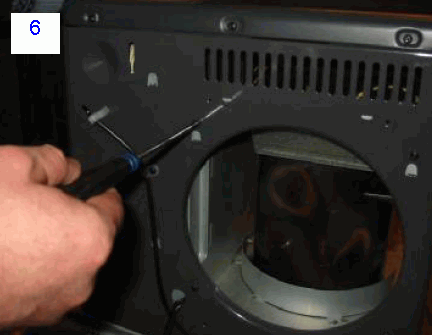
Turn the heater around, and remove the four screws which secure the combined rear convection grill and fan assembly. Once the screws are removed, lift the panel up slightly to unhook it from its mounting grooves, and gently place it on the floor. Note that the actual fan, and its wiring also come away with the panel, so care should be taken not to stretch or damage the wiring or fan blades.
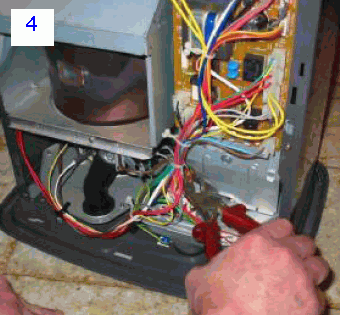
Next, locate the small electronic fuel pump which is found to the bottom right, under the control pcb. Using pliers, loosen and remove the pipe housing connector from the top of the pump. Once undone, the copper fuel pipe simply lifts out of the pump outlet nozzle.
Remove the single screw from the bracket mounting which holds the copper fuel feed pipe.
Return to the rear panel, and behind the previously removed fan assembly, are four additional screws. These hold in place, the main grey metal enclosure containing the burner.
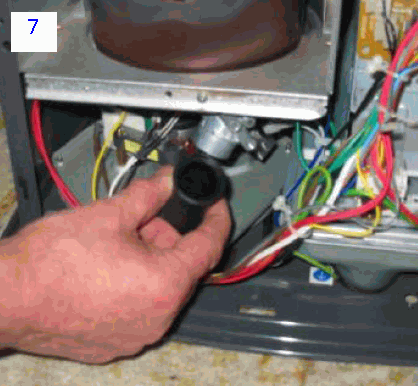
Remove the rubber air pipe, which connects to the lower combustion fan unit in order to supply air to the burner.
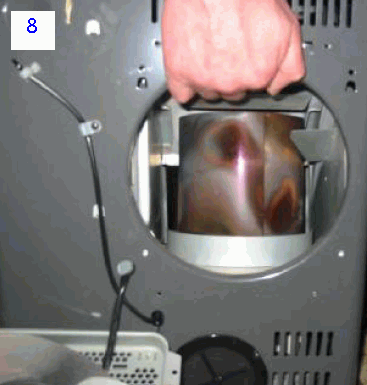
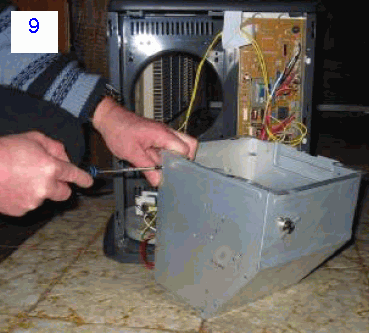
With slight force, push the grey metal burn chamber enclosure upwards and forwards in order to unhook it from the rear panel, and once released you should be able to pull the enclosure forward, and out of the front of the heater. Be careful of the fixed wiring which is still attached to the underside of the enclosure, but there is just enough length on these wires to pull the enclosure just outside of the front of the heater and lie on the floor / bench in order to work on.
Disconnect, the two yellow wires which are fixed to the thermal switch on top of the grey metal enclosure, you may also find it a little easier to undo some of the plastic wiring loom clips to allow a little more flexibility in the cables running to the enclosure. Next remove the side screws which hold the metal enclosure together in order to access the main atomization (burn) chamber,
Once the metal sides of the enclosure are removed, you will now be able to see and access the main burn chamber. On some models you will now also need to remove the round metal top on the burn chamber. To do this, pull up the two metal tab ‘ears’ which are folded down, and straighten them upwards, the top should now pull upwards over the tabs and you can remove it.
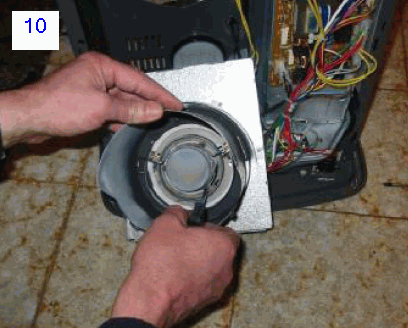
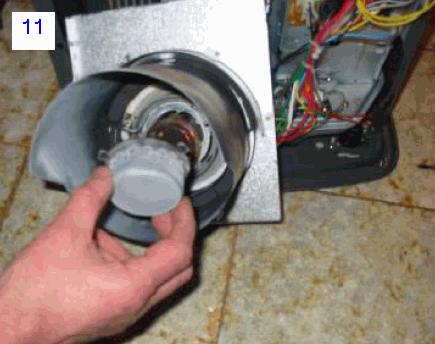
Using a long screwdriver, undo and remove the three screws which hold the burner plates onto the atomizer. There are two parts to this burner, which should just lift out, however be careful of the bottom part, which has a very thin, delicate gasket underneath it.
Give the two parts a very good clean in order to remove all of the carbon deposits. First I soaked them for several minutes in a mixture of hot water and dish detergent, and then used some foaming Oven Cleaner (Mr Muscle Brand in the UK) and an old toothbrush to completely scrub the mesh clean. Wear gloves at this point as not only is it a dirty job, but oven cleaner is caustic and can cause skin burns. Rinse completely after cleaning and allow to dry.
Inside the burn chamber, there are two small metal rods. One of these is connected by a thick wire and is the igniter and generally requires no cleaning. However there is also another curved metal rod at the opposite side to the igniter, which is the flame rod (Flame Detector or FLOD). This is effectively a sensor which sits in the flame in order to sense that the heater has successfully lit and monitor the flame and so over time can also quickly get covered in carbon which changes its Electronic Resistance and will eventually lead to the heater incorrectly thinking that the flame is not longer present – shutting down with ‘E1’ or ‘F1’ error codes.
Remove the flame rod, by firstly disconnecting the wire attached underneath, and then remove the single screw holding the rod bracket in place inside the chamber. It may be useful to take a photo at this point showing the exact original position of the flame rod, so it can be refitted in the same position.
Pull the flame rod out, and also scrub it with oven cleaner. Next use some wire wool or fine grit sandpaper and gently remove any remaining stubborn soot and carbon deposits and return the rod back to as much bare metal as is possible without damaging the surface. Rinse in cold water, dry and refit the flame rod back into the chamber – maintaining its original position.
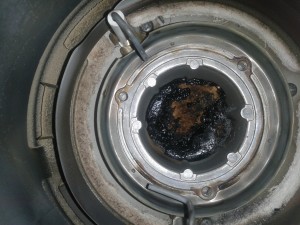
Finally, give the burn chamber a good clean out with a vacuum cleaner. Whilst you have the Combustion Chamber apart, its also worth checking the bowl under the burner to check for rust / muck build up. The image below was emailed to us by “Mister B” and shows large amounts of build up, which caused combustion errors, eventually leading to the heater continuously shutting down. Using Dipetane Additive at the dose of 10 ml to every 4 Litres of heating oil should reduce the amount of this Carbon build up
Once everything has been cleaned and allowed to dry, carefully Re-assemble the heater, test and enjoy your newly serviced Corona Inverter Heater!.
I would also recommend (if you are not doing so already) that you filter any fuel (regardless of premium C1 paraffin or heating oil / kerosene) through a “Mr Funnel” filter in order to remove any water / dirt contamination and help to minimise future issues.

I’ve also recently (2019) found a fuel additive called Dipetane which seems to help reduce the amount of carbon build up in the combustion chamber when added at the dose of 10ml to every 4 litres of fuel, and so should help prevent a return of the error in the future. (Although annual checking & servicing should still be maintained).
For those who require a little more information and a better, more informative guide, there is a video below which shows the entire procedure. Thanks to Jon Porter for providing the Video link, and to “Porky Wizard” for producing the detailed 90 minute video!
If you are still encountering “E” or “F” based errors on your inverter heater, even after following the guide above, then its probably time to replace the flame rod with a new part. Alternative, a work around exists which restores the functionality of the existing Flame Rod and is described in the following video.


Hi
Thank You so much for this video, helped me and my Inverter works perfect now!!!!! Thank You!!!!!
Thanks for very detailed and informative video showing dismantling and assembly of the Corona inverter heater.
I have one of these units and am experiencing the co2 fault at start up and during running even though the room is well ventilated (I have tried running the unit in an open garage and the fault still persists)
Have you any ideas on how to fix this problem I asume it must be the co2 sensor – I do not know where it is in the heater – I would be gratefull for any help with this problem.
We live in a remote area of France and I try to fix everything myself – it is a personal challange and rewarding and also saves us money!
I would hate to have to buy a new unit as when it’s working it gives us good immediate heat at a reasonable cost.
Hope to hear from you soon
regards
Dave
Hi Dave,
Unfortunately I don’t have access to either a service or workshop manual for these heaters, so my advice is based on purely on the experience of servicing and maintaining my own!. On the back of my Corona Inverter heater are two black shrouded ‘probe’ type sensors, one is located just under the metal grey rear fan intake grille, the other is located higher up towards the top of the heater. I believe that one of these sensors would be the room temperature sensor and the other, i’m thinking, would be the CO2 sensor, although which one is which isn’t immediately obvious just from their location.
To make it a little easier, if you can follow the instructions above to stage 2 (where you can view the control circuit board), many of the external wires running to the control board have symbols or words printed on the surface of the PCB where they plug in, indicating the function that they perform, perhaps you can identify the CO2 sensor from these idents and then trace the sensor by following the wire from the control board?. I imagine it would be marked either as a “CO2 sensor” or “air quality sensor” where it plugs in on the control board. I imagine the sensor would have either two or three wires, so that narrows the search down a little.
If you need any help with doing this, you are welcome to email me a close up, high res photo of the actual control board in your heater, and I will take a look and try and point you in the right direction. My email is admin(at)electricheatingcosts.com (replacing the word (at) with the conventional email ‘@’ symbol)
Thanks for your guide. I’ve been using heating oil in my Inverter for a while now and it struggles to start, I suspect a lot of soot in the burn chamber. I am planning on servicing it as per your guide – hopefully it this will restore it to its former glory!
Hi,
To be honest i’ve never come across any ignition issues when running on Heating Oil, and both of my heaters run fine on it, when they are used (which at this time of year is on a nightly basis), so I would imagine that your current problems are down to one of three possibilities
(a) Fuel Quality – at this time of year its possible that your fuel vendor has had the same tank of heating oil all over the summer months – fuel demand obviously drops over the warmer months, and so fuel stands around for several months. Most fuel brokers store their fuel in underground metal tanks, the warm air / sun on the ground above causes condensation which forms on the sides / top of the tank and drips into the fuel. These tanks hold thousands of litres of fuel and the water contamination is tiny in comparison, and so in most cases it doesn’t cause a problem for traditional heating oil based systems. However these heaters are far more sensitive to stale / aged fuel and water content, usually resulting in ‘E4’ errors or difficult ignition. If you don’t have one already, I would buy a Mr Funnel type filter (which is designed to remove all excess water from fuel) and routinely filter the fuel through it everytime you fill the heater tank.
(b) Fuel type – make sure that you are using the correct grade of Heating Oil. There are two types on the market, one is called 28 second Kerosene and the other is 35 second Kerosene. You need to be using 28 second heating oil (usually a light yellow colour), as the 35 second isn’t suitable for these heaters (it is effectively red diesel). Some fuel brokers can dual use their storage tanks also at different times of year, so it could be possible that the broker has previously stored another type of fuel (such as diesel) in the tank, which has slightly contaminated the existing fuel. If you have not already done so, it may be worth trying some fuel sourced from another fuel vendor.
(c) Soot – you have already mentioned this as a possibility, and its good practice to clean out the heater at least once a year if it gets used on a regular basis. Pay careful attention to cleaning the Flame Rod and in your case it may also be worthwhile cleaning off any obvious carbon deposits on the ignitor, and gently sanding it with some very fine grit sandpaper. Ignitors, by design, are considered to be wear and tear items on any heater, so depending on the age of the heater and how much use its had, the ignitor itself may need replacing, if cleaning alone doesn’t solve the problem.
Cleaned and serviced – now my heater lights properly first time and runs great, possibly better than new..
Oddly enough – my flame rod had another short bit of metal stuck to the side of it near the end exactly parallel to it, it snapped off just by using my fingers. I wonder if it was a manufacturing error. I took a photo just in case.
David Evans – prior to servicing my heating and cleaningand servicing I too had intermittent problems with the heater cutting out after 10 minutes with a co2 error.
The E4 fault Video Was very very helpful, can you tell me where i can buy a flame rod for the Corona Inverter 506/509 Please ! I have looked on eBay and i have Googled it but cant find one anywhere, Can you help please
Kind Regards Pete
Try “Dry it Out” in the UK, they can supply most spares for these heaters, I think the cost of a replacement Flame Rod is around £20. The contact email I have for them is roger[at]dry-it-out.com – (replacing the [at] with the conventional email @ symbol) their phone number is 01588 620126.
For spares elsewhere in Europe, try http://essege.com/
Hello, my Inverter 5096 keeps running out of fuel even when the fuel tank contains fuel. The low fuel alarm acivates then it shuts down. To me it appears to be pulling a vacuum in the fuel tank and once the negative pressure balances the weigh of the fuel in the tank, no more fuel will flow out of the fuel tank. Any suggestions anyone.
Hi Peter,
If your 5096 uses the same fuel dispensing process as my 3016 then its probably the spring loaded valve plunger in the cap on the fuel tank which is sticking. I’ve had several minor issues with mine, and I soon discovered that even when the peg on the strainer pushes the valve open, when the tank is in place, fuel sometimes doesn’t always flow, and I have to remove the tank and depress and release the plunger on the cap a few times before fuel flows into the reserve tank at the bottom of the heater.
I can imagine that its possible that something similar is happening here, fuel stops being dispensed from a randomly sticking cap valve, eventually the small amount of fuel contained in the bottom reserve tank feeding the burner is exhausted, no more is fed from the main tank and the low fuel process begins.
Try removing the tank cap, quickly flip the plunger open / shut a few times and then putting it back in place, it may be as simple as that, in which case a new replacement tank cap may solve the problem in the longer term.
Failing that, it may be the float in the bottom tank which is intermittently misreading the level of fuel, and alse triggering the low fuel alert.
Hello admin, thank you for your quick reply. I have had a few issues with the tank filler cap valve. Sometimes it does not close completely when I remove the fuel tank from the heater. I now keep a rag close by just in case I need to catch any leaking fuel. Since my first email I have removed and cleaned the lift out filter which sits on the top of the small fuel tank and given it a clean {though it did not appear to need any cleaning to me}. However, since cleaning the filter the heater has functioned perfectly. So fingers crossed etc.
Thanks again,
Peter.
Hi, thanks for the instructions, I did also have another issue which was as follows.
when I dismantled the burner I noticed a very heavy build of carbon/rust/gunk in the bottom of the receptacle under the filters. I didn’t clean this first time, just the ‘flod’ (flame rod) and spark igniter, filter etc. I still kept getting the E4 error message, so dismantled again and this time carefully chipped away at the built up deposit, hoovered it all out and reassembled. PERFECT !!!!! it might be worth adding to the tutorial to clean out the chamber under the filters aswell, to clear any carbon deposits etc.
I suspect its down to the fuel i have been using, although its a premium fuel I suspect it is causing the problem, so i have now invested in a Mr Funnel filter – and I noticed bits of debris in the bottom of the filter that would have normally just gone straight into the heater and probably contributed to the build up of crud!
You really shouldn’t be getting these issues running entirely on Premium Fuel, if there is any contamination in a newly opened premium fuel container, then you need to send it back to the Vendor.
My two heaters have run on bog standard 28 second heating oil Kerosene for all of their working lives ( with an occasional dash of a specialist additive), and I service and drain them at the end of every Winter season, but even running on the non approved fuel I haven’t experienced any of these problems (hence no Tutorial so far), nor noticed any excessive build up of rust or general gunk, just the usual soot deposits which are expected through running a heater on a daily basis for six months. I have always used a Mr Funnel for every fill though, right from the start.
Rust is obviously a clear indicator of water contamination, something which the Mr Funnel will remove, so hopefully you won’t experience the problem again. Its a bit of a concern that this has happened when running on Premium fuel though.
Hi
I have exectly the same CO2 problem with my Inverter Mini Max (type SRE127) like David Evans on October 26, 2014 at 6:37 am. My heater (from 2007) is not exactly the same as shown in the video, but many parts look the same. I bought my heater in Italy and the manufacturer (or importer) is: Ligne Plus SA, Rue Pierre e Marie Curie, 15, 57260 Lezennes (France).
I find the CO2 sensor. It is connected with 3 wires (red, blue and grey) with the main print. On that main print (or how do you call it in English) you can find the word “CO2″ directly next to the plug with the 3 wires I mentioned. The CO2 sensor itself is mounted on a print of about 2″x2” and called: CO2 Engine-FH 0502A828 (See dropbox link). It is placed -in my heater- left under directly behind the front panel.
I think when I would replace the sensor my problem is over, but….
How do I find a new one? I know the OEM-part manufacturer (it is printed on the sensor): SenseAir in Deisbo Sweden.
but then I not get any further.
Who can help?
As an additional comment re the build up of crud, the heater had for some time become more and more difficult to ignite, the main symptom being that ‘puffs’ of vapour/steam were being emitted prior to ignition and being pushed out into the room by the fan. I thought it was possibly steam from any water in the fuel (though as it was a premium brand, ready sealed, I wasn’t sure how this could occur, unless I was storing it incorrectly?) I now suspect this emission was caused by the crud heating in the burner chamber as after having cleaned it out we no longer get that emission.
So, if anyone else starts to experience the ’emission’ issues, then clean your combustion chamber!
I received a respons from Essege the European distributor & importer
“The CO2 engine is probably defect.
If you live in Italy, I believe the easiest way for you to order a CO2 device is by getting in touch with our Italian colleagues:
Tecno Air System Italia
Via Piovega, 10, 31010 Paderno del Grappa (TV)
Tel : +39 0423 948800
http://www.tecnoairsystem.it”
In the meantime I found a local service center at 20km’s as well:
PIERPAOLI VALTER
VIA NAPOLI, 32, 61030 CALCINELLI SARTARA (PU)
+390721894461
Hi Henk,
Thanks for the update, please let us know if replacing the CO2 engine cures your heater fault, as it may be useful for other heater owners in the future.
Because I have 2 Inverter heaters I tested the CO2 Engine by exchanging them.
First I checked if they are of the same type on both heaters (INVERTER 6747 and INVERTER MINI MAX) and they were.
So now I am sure the CO2 Engine is defect.
You can find the service centers in Italy on:
http://www.tecnoairsystem.it/skin/frontend/default/tecnoairsystem/images/pdf/C_Assistenza_luglio_2014.pdf
I ordered the CO2-sensor (CO2 Engine-FH, with code EAN: 5420020084548) for my INVERTER MINI MAX (also suitable for other types like INVERTER 6747).
It arrives in 10 days and costs €63 in Italy.
The print with the CO2 sensor is easy to assemble. Remove the old print by squeezing the white nylon supports with pliers, remove the little plug with the red, blue and grey wires and install the new CO2 sensor in reverse order.
Hi Henk
Thanks for the ongoing updates and also the information in relation to a supplier and price for the replacement CO2 engine. Its good to read comments from people sharing information and helping each other on this blog.
Hi there,
I just found these pages trough looking for co2 sensor problems (Zibro made by Toyotomi) . And while reading i was wundering what the biggest differences are between these two heating systems. i own two Zibro´s , they use a burnermat, is this the only big difference?
Best regards
Erik
Hi there
Just wanted to add my thanks for the very informative ‘step by step’ guide to servicing these heaters. Mine is a good few years old and recently started to become very smokey on start-up and shut-down. Decided it needed a service and found your guide whilst doing a Google search. The one used in the pictures is the very model I have, and it took me no more than an hour to clean it all out, re-assemble, switch on, and once again, heating perfectly.
So thank you again!
I seem to have run in to another problem with my Kero heater. It seems fine when running full speed and heating the room up to temperature but when its there and backed down a little I’m getting spurts of yellow flame. This wouldn’t usually be a problem but its causing the flame to extinguish with an E2 error as shown in this video:
http://youtu.be/QS3naE4gXrk (shows the yellow flame – not the e2 error)
I’ve taken everything out and cleaned it again (not that there was much to do) but it doesn’t seem to have made any difference.
That is just strange, i’ve never come across that problem before!. There is no audio on the video, so my first question is, does the tone of the heater change, around the time that the yellow flame appears?, any strange mechanical sounds? or a slight change in pitch from anything inside the heater.
E2 represents a combustion error, have you checked the combustion chamber fan which is located underneath the burner?. It might be worth disconnecting the small rubber hose which connects the fan housing to the combustion chamber and supplies air to it. Check for cracks in the hose or loose connections, it may also be worth checking for any dust inside the hose and fan unit itself.
The other thing to check and blow through is the fuel line between the little facet pump and the burner.
If the above doesn’t solve the problem, i’m currently testing an additive called “Dipetane”, and whilst I am the first to admit being a huge sceptic when it comes to the benefit of any kind of snake oil additives, i’ve been adding it to the kerosene in one of my heaters for the last few months, and it does seem to be reducing the normal carbon build up, compared to the other heater (which is run without the additive). I’m not actively promoting the additive on the blog as yet, as its still early days and I want to continue testing for the rest of the Winter, but I came across it on a forum last year, with many people praising its cleaning properties in relation to aga’s and oil fired boilers. I’m thinking if there is a small issue or fuel related blockage somewhere, it may be enough to clean it through, it also professes to clean and lubricate pumps and moving parts. Its just a suggestion, rather than a direct recommendation.
If you can’t find a stockist of Dipetane locally, it is for sale on E bay
Yes, the tone of the heater does change. There was audio on there but the heater is very quiet. I’m hoping that the fuel pump hasn’t gone again! There must be a way of refurbishing them.
I’d be surprised / shocked if your pump has failed so soon (unless you are being sold some extremely poor quality fuel), as well as the advice already given above, perhaps try some ‘proper’ approved fuel? to see if this resolves the problem.
Alternatively, (if it is the pump, but i’m not convinced it is) you could replace the pump with a standard multi-purpose facet type, these will pump anything, unfortunately its finding out the voltage and pumping capacity in order to replace it with a direct equivalent which would be the biggest problem.
Out of interest, do you still have the old pump?, if you have the manufacturers information / part number on the pump then please post it up, and I’ll try and find out what the specification is.
Incidentally, i’ve just tried the video again, with headphones on and the volume cranked up, the noise which occurs sounds just like the muffled boom you would expect from the flame disturbance, its not really a mechanical sound like something about to give up!.
Thanks for the reply. As well as the noise from the flame disturbance there is a slight pitch change the unit. Unfortunately it seems that my phone isn’t capable of picking it up.
I still have the old pump. I will get some details and pictures of it tomorrow. I kept it with the intention of trying to take it apart.
Regards
OK – so I found the pump and decided not to wait untill tomorrow…this is the markings on the bag the replacement pump came in:
http://postimg.org/image/3kz1hliy7/
The only markings on the pump unit:
http://postimg.org/image/5cp3nw1yv/
Wide shot of the unit:
http://postimg.org/image/4xnpfa4rf/
Regards
Yes it looks like a magnetic piston pump, very similar in its principle of operation to the aforementioned facet pump. These create a pumping action, using a very rapid push-pull action of a solenoid control arm or ‘plunger’. These pumps are generally fairly robust, and are used in everything from Coffee and Vending Machines, to Smoke machines. There are very few moving parts – just the plunger and parts associated with it, so it might be possible to repair the old one, and any local engineering company should be able to supply replacement mechanical parts, if you hand them the old ones to x-refer. If you do decide to have a try, also replace any gaskets or washers with new ones made of viton, as this material won’t shrink or react to any fuel in contact with it – including neat Kerosene.
Serviced my corona as you described and fires up very quickly with no nasty smells and no more cutting out.cleaned out a lot of grunge and I have ordered a Mr funnel .many thanks
Co2 sensor – hi, read through the posts and I seem to have the co2 sensor problem now (this is my heater in france not the gunked up one in the uk) – gave it a quick service and still get the co2 error. the co2 sensor is flashing intermittently when it tries to start up, is this normal or an indication its faulty? thanks
after a few days trawling looking for info on the CO2 fault (which is probably really a CO fault) showing up, my brother in law found a couple of links via google – the first is the replacement CO2 sensor and lots of other spare parts – http://www.sav-pem.eu/3397-détecteur-de-co2-poêles-à-pétrole-inverter.html# the sensor is priced at 80euros, the second is a forum for the heaters – http://experts-univers.com/notice-kanzai-feu-petrole-electronique-sre-3002.html – it seems to be a common fault on NON UK models – UK models don’t have them, they fit below the main circuit board and are easily seen when removing the front cover, the main circuit board has CO2 detector printed on it where the wires connect it, so are they really required? I think not and anyway you could always just install a CO detector anyway! BUT and its a big BUT, there is a way to remove the sensor without it giving a CO2 fault , simply taking it off produces the fault code. it has three wires, red, blue and grey. leave the CO2 detector in place and snip the wires half way in between. then connect the blue and grey wires together and insulate them (aswell as the red wire of course!) as I said, for peace of mind you could always install a CO detector in the room the heater is being used, and perhaps you should do that anyway!
I don’t want to get into a debate about the removal of a ‘safety’ item, when the safety item isn’t even used in the UK spec heaters anyway! its a simple fix and saves around £60 minus the cost of a CO alarm wherever you use the heater.
ps just to conform the detector was faulty, I tried the heater outside, after fully servicing it, cleaning it thoroughly etc and after about 5 mins, it went into CO2 fault mode!
when I tried the fix to bypass the sensor, it worked perfectly !
I am not suggesting anyone does the fix of course, its just for information purposes only !
Hi, I bought an inverter heater last year and successfully used it over the winter months; however, lately it is leaking into the bund and will actually overflow if I do not turn the heater off. I have serviced the heater recently – it was leaking before, and is still leaking after. I am thinking it may be the fuel tank cap – but it does not leak when it is not in operation. Any ideas on how to remedy would be appreciated.
As far as I know (from my own heater design) the filler cap has a spring loaded valve which dispenses fuel into the lower heater burner tank as the level drops, in the case of mine you can actually here the fuel ‘glug’ occasionally as the level drops and is replaced.
I’m sure that the cap spring valve is opened by a simple locating peg in the bottom of the heater rather than any electrical solenoid or mechanical valve so it would be difficult to think of any failure that could occur. Unless there is come kind of internal float system attached to the peg? – that may be worth checking.
Its very common for the spring valve in the filler cap to ‘stick’, I’ve experienced this on both of my heaters and have now got into the habit of jiggling the valve open and closed a few times after each fill of fuel, which has now cured the inevitable leak over the carpet when the tank was carried back to the heater!.
The rubber seal in the cap is also known to wear, allowing fuel to leak around the sides. So it my be worth routinely replacing the cap anyway, if it is a year old.
Other than that, I can’t think of any other problem which would cause the overfilling problem that you describe.
After my heater has been running for a while it stops and displays the code Ed, no explanation in the manual. I suspect it has something to do with CO2. I would appreciate if some one knows the problem and can explain / advise what remedies there are?
Never come across an ‘ED’ Error Code on this blog before, I have a collection of several different manuals and there is nothing in any of them either. I suspect that these heaters have internal error indication which isn’t documented in the user manuals as they relate to non user serviceable items but the codes are still shown to aid the service engineer.
Generally, if a fault relates to a CO2 problem, then often you will see a lot of yellow / orange appearing in the burner flame before the heater switches itself off, although that won’t help if its a faulty sensor, rather than a genuine ventilation problem.
If you have had the heater a while it may be worth cleaning it, as described above as this does seem to solve a lot of errors
Hi i have fan heater mitsubishi . Error c9 . Can yiu help me please
What is the actual model number of the Fan Heater?. This will be on a label on the actual heater, or on the front of the user manual.
Hi I have a 3200w inverter and after moving , I am getting an e0 error code, any ideas on how to fix this?.it’s done it before when I travelled the unit, and started working after a long time lying still , but winter here now .
Joe
Joe – The E0 code in a Corona Heater usually translates to old or poor quality fuel, is the air intake at the back clear? How old is the fuel you are putting into the heater and how long has it been stored? – have you tried fresh fuel purchased recently?. If you are using standard kerosene in the heater then its worth buying a funnel called a ‘Mr Filter’ – usually available to buy on E bay, this filter not only removes tiny traces of dirt and rust particles which may be in the fuel, but it also removes any water contamination within the fuel, which can cause a lot of random errors in these Heaters, as well as causing rust in the burner and internal metal surfaces. Simply filter the fuel through the Filter as you fill the Heater Fuel Tank.
Its always worth cleaning these heaters at the end of every Winter season as per the guide and video above, especially if they get a lot of use, before putting them away for the summer, I find that preventative maintenance goes a long way to solving a lot of problems. Given the fuel related Error code that you are getting, in addition to servicing and cleaning the burner, I would also carefully take off the brass / metal fuel line which is fitted between the internal pump and burner chamber and blow them through to make sure there are no blockages or dirt trapped inside, also clean the fuel tank and fuel filter / strainer where the fuel tank sits.
Hi thank you for the reply.
The fuel is 2 to 3 years old. I will replace it
And try blowing through the fuel pipe.
I cleaned the unit internally but left the biting pot because of the fragility of the needle
Can this cause an e0 error ?.
Is there a way of draining the internal fuel reservoir ?.
Many thanks
Joe
I suspect that its the fuel that’s the problem, E0 generally means old or contaminated fuel, and your reply does indicate that the fuel is well past being suitable for use – at least in these types of heater. Kerosene has a shelf life of about 12 months, and that is when stored in a dark place, in an airtight container. Beyond that, the fuel starts to age rapidly, and will also absorb water, the older the fuel the more likely it is to cause problems, especially if its been exposed to air for any period, or badly stored.
I’ve never attempted to empty the small reserve tank within the heater itself, and I don’t think that I would attempt it. Assuming the heater will light and run for a while between giving the Error code, I would run the heater with the main tank empty, so that the heater runs from the fuel in the internal tank – using it up. The heater will probably sound the low fuel alert and run at reduced output but it should run long enough to use up the fuel which is left to the point where the heater will shut itself down due to the lack of fuel. Normally this will take between 10 and 20 minutes of running.
At which point you can fill the main tank with fresh fuel, there will still be a small reserve amount in the internal tank as the heater won’t allow itself to run dry, however it will be massively diluted by the new fuel to the point where it won’t create any problems.
If the heater doesn’t run, or won’t run for long enough to burn off the fuel in the inside tank as I have advised above, then you will just have to fill the main tank with new fuel and hope it dilutes the existing fuel. The internal tank only holds a small amount of fuel, so it may be ok.
Using new fuel, may immediately solve the problem, however I would still clean the internal fuel lines regardless.
Thank you very much for your help,
I will give it a try and let you know the results
Joe
Very nice video ,helped a lot ,E4 fault gone .
Where can i buy a flame rod and other parts when needed??
Hi,
I wonder if you could give me a bit of advice?
I’m starting to get intermittent starts on my inverter 5096 with E0 error, I’ve checked the fuel filter and it’s looking pretty manky, I’ve tried cleaning it with an old tooth brush and paraffin but it’s not really doing anything!!
Do you know of another method of cleaning or can you point me it the right direction for obtaining a new one, I’ve been all over ebay and amazon and managed to find only one seller who won’t post outside of the UK!!
Brilliant article by the way, I’ve bookmarked it in my favorites!!
Thanks in advance for any advice you may be able to give.
Dave
Hi Dave
Probably a stupid question (as you are commenting on the actual article) but have you also tried stripping down and cleaning the inside and the heater and burner chamber as detailed in the instructions and video above?.
If not, its well worth spending a few hours following the guide since it does solve a lot of random ‘E’ based errors, and its generally good practice to routinely clean it before putting it away in the spring, assuming it gets a lot of use over the Winter!.
You also mention that the fuel filter looked manky, what type of fuel are you using in this heater? and do you filter it before it goes into the heater?. If you don’t already filter, It would be good practice in the future to filter any fuel through a ‘Mr Funnel’ filter linked to in the article. This filter not only removes the usual dirt particles from the fuel, but also any water contamination absorbed into the fuel too, which can happen during storage and distribution of the Kero / Paraffin, helping to prolong the longevity of the filter and heater alike.
The Corona 5096 Inverter Heater is exactly the same heater as the Corona 5006 model, so it may also be worth asking for a replacement Fuel Filter for a 5006 heater as they will be the same part.
Edit – Following my Own Advice, i’ve managed to find a replacement Fuel Filter for a Corona 5006 / 5096 Heater here (Click Me)
If my link takes you to the same retailer who won’t post outside of the UK, then also try Technoair System in Italy and SAV Meches and SAV Pem
Thank you, you are a life saver!!
I’ve ordered a new filter from Sav Pem, I would never have found them.
The only fuel you can buy here in Greece is pre-packed 18 liter canisters of Kerosine, it seems pretty clean but I’ve just ordered a Mr Funnel for future use.
I’m going to strip the heater down this weekend and give it a good clean as per your instructions.
Thanks again for your help, it is much appreciated!
Cheers
Dave
Hi, I have an ‘Inverter’ heater inherited from my Mother-in-Law which she bought in France. Nowhere does it say it is a ‘Corona’, but the images and details seen on your videos shows my heater to be identical externally and in general layout. The model is a 5710 with an output of between 800 – 3000 Watts with a 7.2litre fuel tank.
It has come up with error E4 in the past, but a good clean has seen it working fine again. Today I am getting E6 after the unit has started up and run fine for 15 – 20 minutes, after which it shuts down. Referring to the manual this denotes an electrical fault “see your dealer”. Well, that’s not going to happen as it came from a supermarket chain in central France in 2003! It did get serviced in France at huge cost, but here in the UK I have stripped and cleaned the entire unit myself with no problems – until now. E6 does not tell me which component may be at fault other than an electrical fault. So I’m asking for some guidance on just what it may be, or, a distributor servce engineer within striking distance of Much Wenlock in Shropshire who may be able to help.
Many thanks.
Hi Derek,
There is only one place that I can think of who could probably repair this for you, and that is an individual i’ve seen advertising in the online classifieds over the last few years, who I believe is a sole trader who repairs these heaters. Since the use of inverter heaters still tend to be a niche product in the UK there isn’t yet a service centre in every high street or even every County!.
This business operates in Preston, Lancashire so its a few hours away from you, although I do think they can operate a collect / return service using a carrier service at extra cost. Sadly this is the only business that i’m aware of, who will go beyond just servicing these heaters (which is basically stripping down the heater and doing what I describe here for free).
The phone number for the repair guy is 07988 774336 and his business advert is here. I must add however, that I have never contacted or used his business personally.
In relation to the actual error described, an E6 fault, as you correctly state, is an Electrical Component Failure inside the heater. In the past and from experience of the various discussions here, these Electrical Failures have been found to be caused either by the CO2 sensor inside the heater, or by a component failure on the actual control circuit board itself, which needed the entire circuit board swapping out. Given that the heater runs for a while, then I would personally suspect the CO2 sensor, but that is just an assumption.
One additional thing to check before throwing money at the problem. If you open the heater front, you will see the main control circuit board, with various wiring looms plugged into it, just below that (on some models), is a separate smaller circuit board, this is the CO2 sensor. Generally its only European models which have this additional dedicated CO2 circuit board present, and since your heater was originally purchased in France, its worth just checking if your heater has this fitted. If it has, then try cleaning out the actual sensor itself (usually a funny shaped ‘arch’ fitted across the circuit board), which has a fine gauze opening(s). The best way of cleaning the sensor, is to wipe it over with a dry lint free cloth, and then get a small can of compressed air (the type sold to clean computer keyboards) and give all visible openings in the ‘arch’ a really good blast with it in order to remove any dust or fluff – which can effectively block the sensor and cause false triggering of the protection system. If cleaning the sensor itself doesn’t solve the issue then the entire CO2 sensor board would probably have to be replaced, but sadly there is no real way of testing it first and without a service manual, it really is a process of elimination and working through the most obvious and commonly reported failure points first.
Edit:- I’ve uploaded a picture of the CO2 Sensor PCB on the link below, to help you identify whether your heater has one fitted.
http://postimg.org/image/ik8ztjxs1/
Thanks for the image. I seem to recall seeing that similar image on another website, however, there is no such device inside my heater. It was originally purchased on the 11/01/2003, maybe CO2 sensors hadn’t swept the market back then.
Just spent three and some hours taking the beast apart again, and cleaned the entire burner complex; the sparker; the flame bar; and the bottom fan. All squeaky clean, and she fired up and ran for 15 mins blasting out heat like a good’un – then E6 and shutdown.
This was with the heater beneath an open window facing into the room. Fuel used has been 28sec heating oil for the past four years with no issues. I have been in email communication with Roger at Dry-It-Out, and whilst he had several recommendations, nothing so far has worked.
Thanks for the link, Preston is a stretch, and Roger at Dry-It-Out is closer being in Montgomery. It’s not essential it gets repaired as it’s an upstairs booster which we can easily substitute with electric – but I’d like it working and not a shelf queen.
Stripping the unit I discovered the sparker ceramic is cracked both sides at the ‘hot’ end, though I doubt this has any relevance to my E6. I may just give the chap in Preston a phone call, it needs to be examined that’s for sure.